 Sewing Tutorials
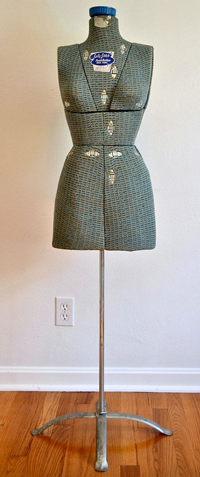
Vintage Sally Stitch body form
Project Materials:
- 1 1/2 Yards chosen colored muslin or cotton
- Measuring Tape
- Thread
- Pins, Scissors, Seam Ripper
- Washable Marking Pen,
- Permanent Marking Pen
- 18" Zipper
- Cotton Quilt Batting (Roll)
- 3 Yards Cotton Cording
- Ruler
- Body Form (Your size or Smaller
- Sewing Machine
- Princess Dress Pattern (fitted, body form hem length plus 2 inches)
Optional Materials
- Bra (worn out-well fitting)
- Cardboard (for shoulders)
- Tracing Block Pattern Making Fabric or Paper
- Bodice Block Pattern (your own)
Or - Fit & Sewing Shell Patterns Vintage on Etsy
Or - McCalls Princess Seam Dress Pattern Or
- Princess Dress Pattern of choice (your appro. size)
Reference Materials
- "Pattern making for Fashion Design" Helen Joseph Armstrong
- "Pattern Drafting and Dressmaking" Dorothy Moore
- "Design Through Draping" Martha Gene Sheldon
- Constructing the Basic Bodice Block"
- Drafting a Princess Line Dress Pattern from the Basic Bodice..." Or
A Perfect Fit: Body Form

Covered & Padded With Your Perfect Size
Introduction:
Sewing and fitting a body form cover is easier than might think. A very practical
and unique way to create your perfect size body replica. Once padded and covered
the body form will provide years of service for fitting and altering patterns. For draping and designing intricate garments. The form is soft, flexible easy to pin into and can easily be updated if your size changes.
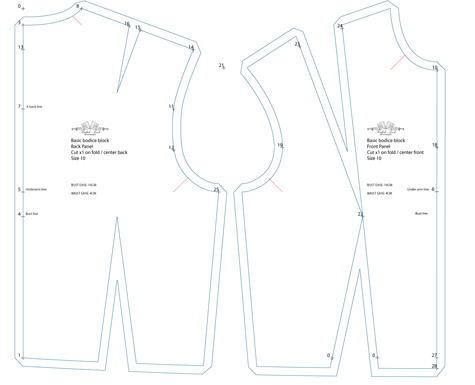
This form cover has eight horizontal seam lines. Two side seams, a front and back center seam, and four front and back dart replacement seams.
The web offers numerous tutorials and available material for understanding and guiding you through the process of creating your perfect fitting muslin shell. (Some recommendations are found in reference materials listed below).
In this tutorial:
- You will learn how to modify and fit pattern blocks (using your own bodice and skirt pattern blocks or fitted shell) to fit and sew a princess seamed body form cover.
- The simple pattern changes that combine these blocks into a sheath dress pattern which then can be converted into the princess seamed pattern.
- How to sew a princess seamed garment, insert a zipper, pad and cover the form.
Any body form available will work, except for one that is too large for your frame.
This sewn and fitted shell is carefully placed on the form, padded and closed with 30inch zipper or if perf erred can be sewn shut at the center front seam line.
There are many methods to create the cover. In this tutorial I offer links to some exceptional information on how to create a fitted bodice pattern. In addition there are links to my favorite books on pattern making and design. Or if you prefer you may use an established printed pattern, I offer one specifically for a fitted shell by McCalls. But any princess style dress pattern can be used to make the fitting changes and style changes to create the form cover.
Step 1. The Bodice Pattern
1. Gather needed materials
2. Choose bodice form pattern. Or create your own using any written instructions found in several pattern making books available.
(See References for my favorites).
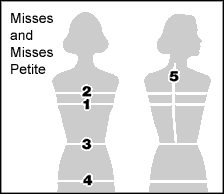
3. Take current measurements: bust, waist, and hips to determine the pattern size closest to these measurements.
Step 2. Cut, Sew & Fit a Bodice Shell
1. Pin bodice block pattern to fabric,
cut out pieces using a 1 inch seam allowance on outer seams lines.
2. Pin and sew darts.
3. Sew all darts.
4. Sew front bodice piece to back at side and neck seams.
5. Wearing undergarments enlist a friend or family member to help fit bust and waist correctly.
6. Fit armhole. underarm, shoulder height, shoulder width, neck circumference, and front, back and side seam length-should fit at natural waist line.
Page is under construction.
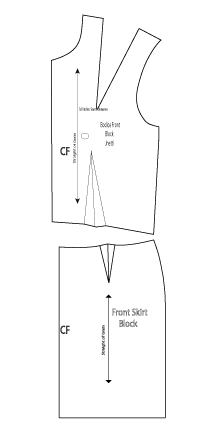
Shown here is an image using your bodice block and the skirt block put together to start the full lenght block
The princess seam line in this image help with fitting.